Do you want to keep all your files on local drives, while also being able to access them from anywhere? Are you concerned about sharing your home IP address with strangers who may be sharing links with you? Is your ISP blocking ports 80 and 443, preventing you from obtaining a valid Let’s Encrypt certificate? Do you want more space than what you’re willing to spend per month on a Virtual Private Server (VPS)? Or do you want to host your own server from the comfort of your home without having a dedicated public IP address?
In this post, we will provide you with all the necessary resources to set up a local NextCloud server that is accessible from anywhere without the need for port forwarding or a dedicated home IP address. However, please note that this is not a fully enclosed tutorial, and you will need additional resources linked in this post to complete this task.
Before we start we will go over some of the pros and cons of hosting at home with this method vice hosting with a vps alone.
PROS:
- As much space as you want without an extra monthly fee. You can have as much space as you have storage devices kicking around.
- Your home IP is not exposed to those who have your domain
- Valid TLS/SSL cert from lets encrypt even if your ISP blocks ports 80/443.
- No need to type in a port number even if your ISP is blocking ports 80/443
- Personal files are not stored on a remote server.
- Ability to host multiple sites on a single VPS using default ports, unlike with NGINX streams.
- No need to install PHP/mariadb on the VPS limiting its attack surface.
- No dedicated home IP address required (ie behind a carrier grade NAT)
CONS:
- Slower speeds for uploading/downloading. File transfers will be dependent on your home ISP and VPS providers upload/download.
- More bandwidth use on VPS: your VPS will be downloading and uploading the file every time a file is transmitted.
- More VPS load: your VPS will be decrypting and encrypting file traffic on the fly. Though this additional load is negligible
- Unencrypted file traffic is observable by the VPS.
- A adequate home upload/download speed is required (30mbps+ in both directions recommend)
- Potentially exposing local network to external exploits
Disclaimer: This method is not end to end encrypted in the classic sense. All data being transmitted over the internet is fully encrypted, however, the data is decrypted and re encrypted on the VPS and the let’s encrypt certs are stored on the VPS.

Before we begin, it’s worth noting that Cloudflare tunnels are available and can be a viable option for many users; however, given the associated risks, I personally do not recommend using this method as an alternative.
Local NextCloud Setup:
The local setup for NextCloud is the same as given in the official documentation. For the local TLS certificate you will need to generate a new self signed cert. After setup you should be able to connect to NextCloud locally for database configuration and setup (Note: an SSL warning will be shown by your browser due to the self signed certificate).
As identified on the NextCloud documentation NGINX is not the only method for setting up NextCloud. It is up to you how you’d like to setup NextCloud and does not change any of the follow on instructions.
Finally, don’t forget to update your NextCloud configuration to include your domain in the trusted_domains array. This will ensure that incoming connections from your domain are allowed.
Additionally, make sure to set the internal WireGuard IP address of your VPS using the trusted_proxies setting. The IP address for this is configured below:
'trusted_proxies' => ['10.0.30.1'],By including your domain and the internal WireGuard IP address in these settings, NextCloud will be able to route traffic to your local WireGuard server.
Note: It is recommended to set up SSL encryption on NextCloud if the WireGuard client is installed on the router or other intermediary devices (i.e., not directly connected to localhost). However, adding local SSL can introduce additional overhead, so disabling it for internal connections will improve performance. While this might seem counter intuitive, there’s a key benefit: WireGuard provides encryption itself, eliminating the need for additional encryption when hosted internally. If you’re still unsure, simply enabling SSL on your Nextcloud server is always a good idea to protect data in transit.
Setting up WireGurd
Now that NextCloud is up and running locally, it’s time to set up WireGuard. To do this, you’ll need access to a Virtual Private Server (VPS) or a remote host with a publicly accessible IP address. While we recommend using a VPS, you can also use any hosting service of your choice.
A cost-effective option is Vultr, which offers affordable plans starting at $3.50 per month. You can sign up for an account using my referral link (if you’d like to take advantage of this) and then set up the WireGuard server on your chosen VPS or remote host.
Once you have your VPS or remote host set up, it’s time to install and configure WireGuard. We’ll provide an overview of the process, and example configuration files will be linked below
for your reference. The preshared key is optional but provides additional security. Once generated, the key should be shared with both the client and server to ensure secure communication (remember this needs to be provided to both the client and server).
$ wg genpsk
DVFZtdvUhaDCNFlPYQl2nrq2UaKbmxTnUCNexxYcggw=
Also notice the port ListenPort provided in the example config is not the default wireguard default port. It is recommended that the default port is not used but must be correctly configured in the client.
Example server configuration file:
[Interface]
PrivateKey = <Server Private Key>
Address = 10.0.30.1/16 # WG IP of server
ListenPort = 53394

[Peer]
PublicKey = <Client Public Key>
PresharedKey = <Preshared Key>
AllowedIPs = 10.0.30.2/16 # WG IP of client
Example client configuration file:
[Interface]
PrivateKey = <Private key of Client>
Address = 10.0.30.2/16 # WG IP of client

[Peer]
PersistentKeepalive = 25
PublicKey = <Public Key of Server>
AllowedIPs = 10.0.30.0/16 # WG subnet
Endpoint = <Server IP>:53394
After installing WireGuard, it’s essential to test its functionality. The most straightforward way to do this is by connecting to the server and attempting to ping the local server IP address. In our example configuration, we’ve set the local server IP to 10.0.30.1.
If you’re experiencing issues connecting to the VPN server, please verify that:
- The port used for WireGuard is allowed through the VPS firewall.
- The public and private keys are correct.
- You can successfully ping the local server IP address from within the VPN connection.
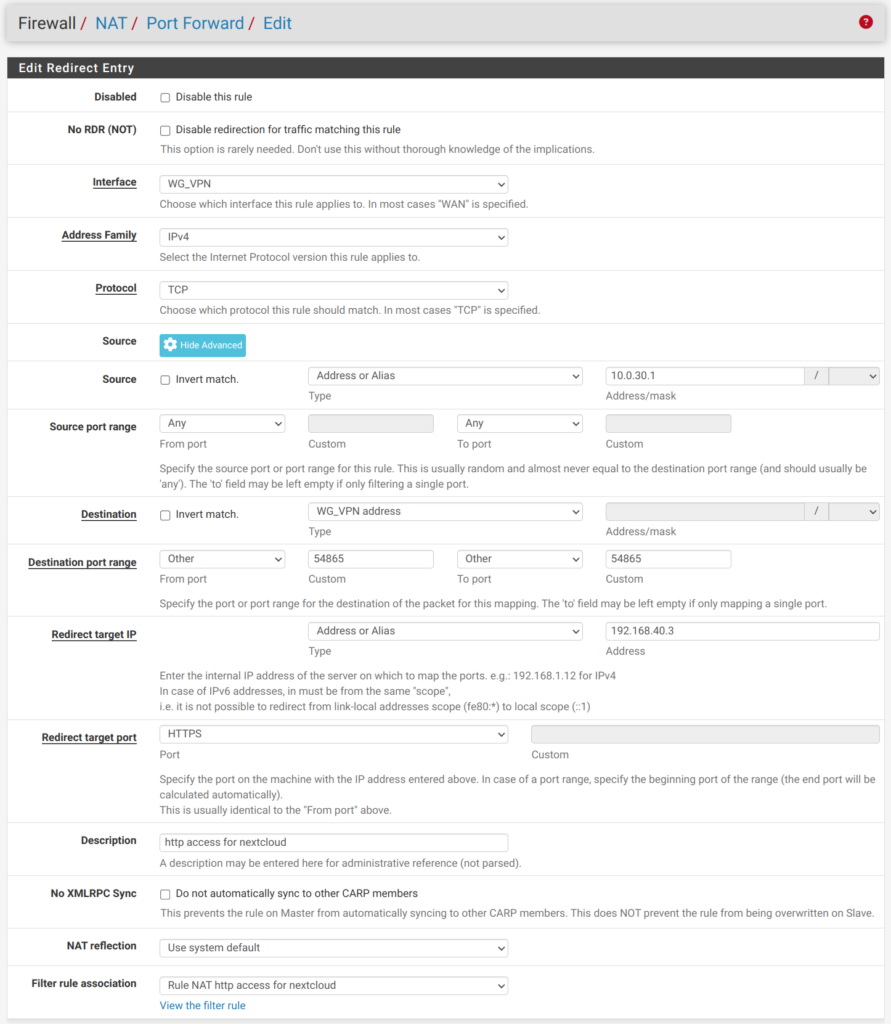
You have a choice now to set up your WireGuard VPN either on your router or directly on a server. If you have multiple servers that you’d like to forward traffic through a proxy, it is recommended that you host the VPN on your router. However, keep in mind when you host the VPN on your router you will need to port forward for the WireGuard interface. This port should be forwarded to your HTTPS NextCloud server.

Setting up NGINX on the VPS:
To make things easier we will setup NGINX on the VPS using NGINX proxy manager. This will allow you to forward the traffic to your client without the need to manually configure NGINX. Because this is a docker container you will need to setup docker prior to installing the NGINX proxy manager.
Below we have provided an example of the docker-compose.yml file. This matches the config provided on the NGINX proxy manager Setup Instructions with the additional localhost setting on the management port (81). This binds the management IP to localhost and preventing external access.
services:
  app:
    image: 'jc21/nginx-proxy-manager:latest'
    restart: unless-stopped
    ports:
      - '80:80'
      - '127.0.0.1:81:81'
      - '443:443'
    volumes:
      - ./data:/data
      - ./letsencrypt:/etc/letsencrypt
To remotely access the proxy manager configuration page use SSH forwarding/tunneling. An example command is provided below.
ssh root@44.22.25.18 -L 8080:127.0.0.1:81
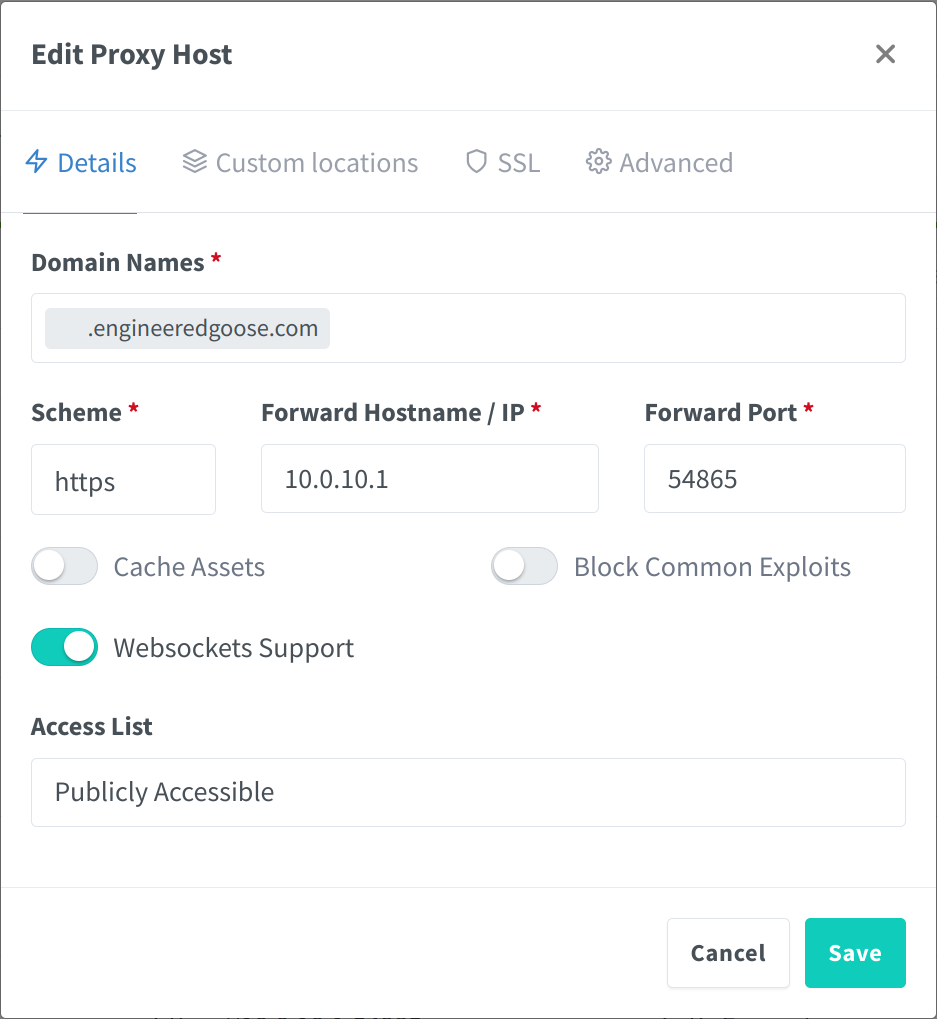
In the above screenshot the forward IP should be set to the internal IP of the home server within the WireGuard tunnel. The port should be set to either the router destination port if hosted on a router or 443 if the home server is running WireGuard itself.
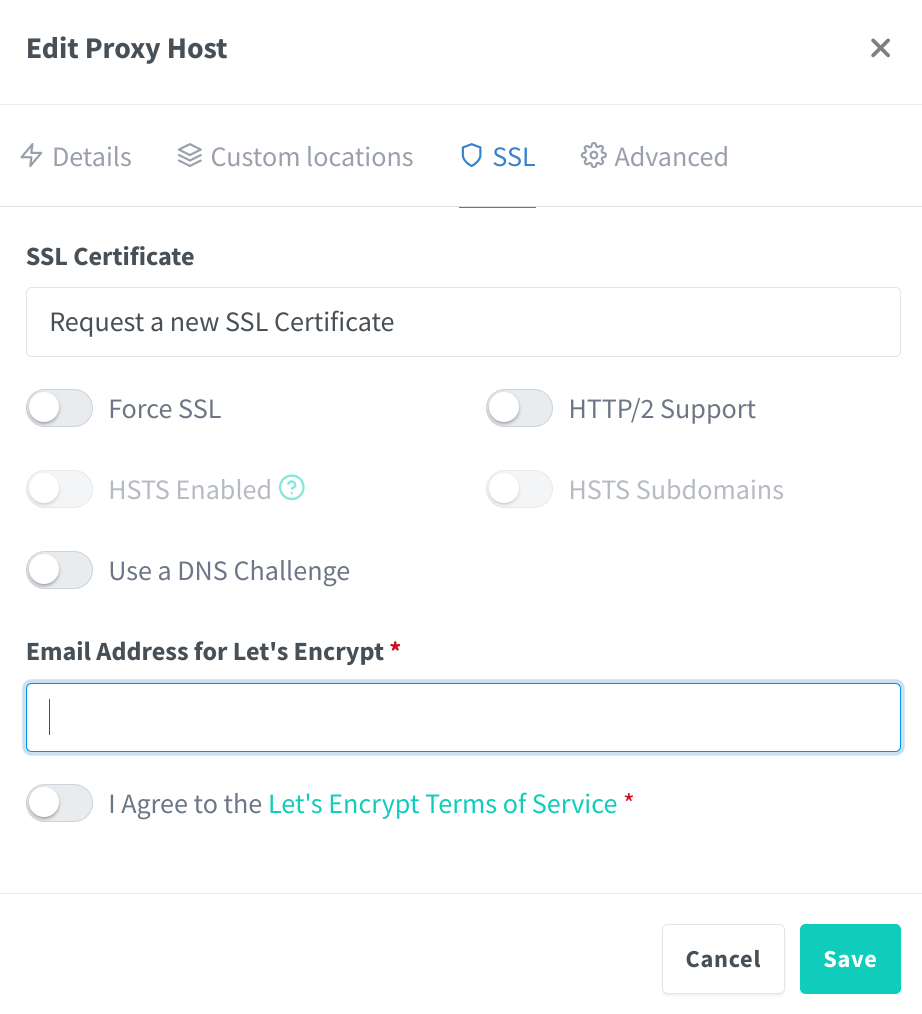
Using the SSL tab NGINX reverse proxy can obtain and maintain let’s encrypt certificates to ensure the communications between your file server and clients is encrypted and does not have any certificate errors. If a certificate is not setup all data, including login credentials and session cookies, will be vulnerable to interception.

Final Thoughts
By now you should be able to access your NextCloud server remotely from your VPS IP. We want to finish up this post with a note on security.
It’s essential to note that hosting NextCloud on an internal router with WireGuard is not more secure than exposing your home router’s IP address through port forwarding. While it may provide some benefits, it should not be considered a substitute for robust security measures. In fact, hosting NextCloud within your home network can actually introduce additional risks, as a compromised instance could potentially expose your entire internal network to exploitation if there is a vulnerability in the Nextcloud server.
Additionally, this setup provides little to no protection against Distributed Denial of Service (DDoS) attacks, which can be mitigated with services like Cloudflare. Compared to hosting Nextcloud on a Virtual Private Server (VPS), this approach may not offer sufficient security and scalability benefits.